#linux find text in files
Explore tagged Tumblr posts
Visit Tumblr Blog
Explore Tumblr blogs with no restrictions, modern design and the best experience.
Last Seen Tumblr Blogs


Fun Fact
In 2020, 44% of users from Denmark used Tumblr daily.
Text
Things I need to do: make food (dinner + 2 days of foodprep), wash my hair, brush my teeth, prepare my clothes for work, pack my work bag, clean up the kitchen, clean up my desk,... Things I am doing: Googling "How to get started with Linux"
#why am i like this#I *really* don't need another hobby#especially not a Torture Yourself (TM) kind of hobby#but someone told me I might get over my tech-phobia if I force myself to learn how to use Linux#and that thought stuck in my head#because “deeply unintuitive and requires specialist knowledge for even basic stuff” is absolutely the right exposure therapy xD#I would have to acquire a shitty old computer tho#I'm not gonna fuck around and find out with my work laptop#anyway#my Linux goals would be: successfully use a browser a text editor and whatever file organization system Linux has#Bonus goals: use spotify and discord#EXTRA HARDMODE goals: use vscode#Linux#tech stuff#IT stuff#bad with computers#but striving to be better#disaster thoughts
3 notes
·
View notes
Text
how to build a digital music collection and stuff
spotify sucks aaaass. so start downloading shit!!
file format glossary
.wav is highest quality and biggest
.mp3 is very small, but uses lossy compression which means it's lower quality
.flac is smaller than .wav, but uses lossless compression so it's high quality
.m4a is an audio file format that apple uses. that's all i really know
downloading the music
doubledouble.top is a life saver. you can download from a variety of services including but not limited to apple music, spotify, soundcloud, tidal, deezer, etc.
i'd recommend ripping your music from tidal or apple music since they're the best quality (i think apple music gives you lossless audio anyway. .m4a can be both lossy and lossless, but from the text on doubledouble i assume they're ripping HQ files off apple music)
i also love love love cobalt.tools for ripping audio/video from youtube (they support a lot of other platforms too!)
of course, many artists have their music on bandcamp — purchase or download directly from them if you can. bandcamp offers a variety of file formats for download
file conversion
if you're downloading from apple music with doubledouble, it spits out an .m4a file.
.m4a is ok for some people but if you prefer .flac, you may wanna convert it. ffmpeg is a CLI (terminal) tool to help with media conversion
if you're on linux or macOS, you can use parameter expansion to batch convert all files in a folder. put the files in one place first, then with your terminal, cd into the directory and run:
for i in *.m4a; do ffmpeg -i "$i" "${i%.*}.flac"; done
this converts from .m4a to .flac — change the file extensions if needed.
soulseek
another way to get music is through soulseek. soulseek is a peer-to-peer file sharing network which is mainly used for music. nicotine+ is a pretty intuitive (and open-source) client if you don't like the official one.
you can probably find a better tutorial on soulseek somewhere else. just wanted to make this option known
it's bad etiquette to download from people without sharing files of your own, so make sure you've got something shared. also try to avoid queuing up more than 1-2 albums from one person in a row
tagging & organizing your music
tagging: adding metadata to a music file (eg. song name, artist name, album) that music players can recognize and display
if you've ripped music from a streaming platform, chances are it's already tagged. i've gotten files with slightly incorrect tags from doubledouble though, so if you care about that then you might wanna look into it
i use musicbrainz picard for my tagging. they've got pretty extensive documentation, which will probably be more useful than me
basically, you can look up album data from an online database into the program, and then match each track with its file. the program will tag each file correctly for you (there's also options for renaming the file according to a certain structure if you're into that!)
there's also beets, which is a CLI tool for... a lot of music collection management stuff. i haven't really used it myself, but if you feel up to it then they've got extensive documentation too. for most people, though, it's not really a necessity
how you wanna organize your music is completely up to you. my preferred filestructure is:
artist > album > track # track

using a music player
the options for this are pretty expansive. commonly used players i see include VLC, foobar2000, clementine (or a fork of it called strawberry), and cmus (for the terminal)
you can also totally use iTunes or something. i don't know what audio players other systems come with
i personally use dopamine. it's a little bit slow, but it's got a nice UI and is themeable plus has last.fm support (!!!)
don't let the github page fool you, you don't have to build from source. you can find the releases here
click the "assets" dropdown on the most recent release, and download whichever one is compatible with your OS
syncing
if you're fine with your files just being on one device (perhaps your computer, but perhaps also an USB drive or an mp3 player), you don't have to do this
you can sync with something like google drive, but i hate google more than i hate spotify
you can get a free nextcloud account from one of their providers with 2GB of free storage. you can use webDAV to access your files from an app on your phone or other device (documents by readdle has webDAV support, which is what i use)
disroot and blahaj.land are a couple providers i know that offer other services as well as nextcloud (so you get more with your account), but accounts are manually approved. do give them a look though!!
if you're tech-savvy and have an unused machine lying around, look into self-hosting your own nextcloud, or better yet, your own media server. i've heard that navidrome is a pretty good audio server. i unfortunately don't have experience with self-hosting at the moment so i have like zero advice to give here. yunohost seems to be a really easy way to manage a server
afterword
i don't know if any of this is helpful, but i just wanted to consolidate my personal advice in one place. fuck big tech. own your media, they could take it away from you at any moment
2K notes
·
View notes
Text
In light of the recent Nintendo boycotts, I come bearing a gift
I'll copy/paste a message I've been sharing in discord servers
If you like Nintendo games but hate the company, today's your lucky day
This is totally illegal and you absolutely shouldn't do it because its wrong, so I'm gonna tell you exactly what to do so that you guys know not to do it!
You guys absolutely should not download Azahar Nintendo 3DS emulator and then go onto Citra-emulator.com to find old Nintendo DS and Nintendo 3DS games and then open the games through Azahar for to play free, including Tomodachi life, ACNH, The Sims 3, Nintendogs + Cats and Flipnote Studio.
You really shouldn't do this stuff its its illegal but if you did it, it would totally work and no one could stop you. Also I work in tech and virus scanned random files and they all came up clean so its safe but its still illegal don't do it................. (But you totally could and no one would stop you)
The Citra emulator doesn't work because the dev got hit with a lawsuit. He went on to work on Azahar. They say not to do this for legal protection, but it fully works.
As far as I know, these games do not have piracy barriers EXCEPT Tomodachi Life (A large red cross over the character faces). I have a debug file that fixes this. If you guys come across another game that has a barrier let me know and I'll search for a debug
Tutorial
Use this link to download the emulator
https://azahar-emu.org/ scroll all the way up to "Download". Download the version that corresponds with your system (Windows, Mac, Linux, Android)
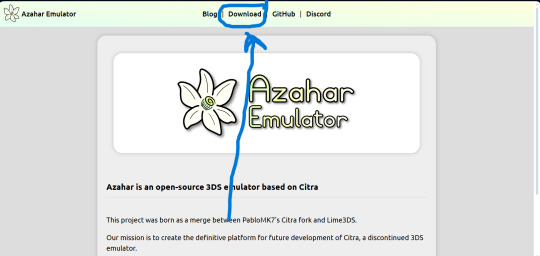
And this link to download the game files
https://citra-emulator.com/ Scroll all the way up to "3DS ROMS". There is an incomplete but still extensive collection of games, both Japanese and English titles as well as Pokemon ROM hacks
On Windows, place the game files on your desktop and open them. It will ask you what app you want to open the file with. Choose "Select app on PC", search for Azahar and select it then press "okay"
(I'm not 100% on the process for Linux and Mac but I'm sure they're similar. On Android I know for certain they are)
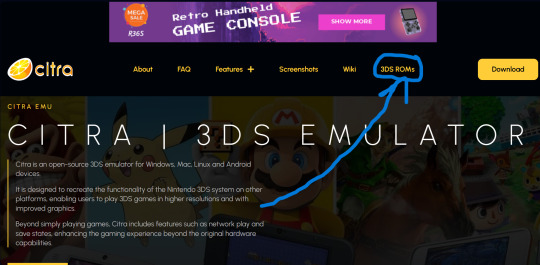
You'll know if it works because the game icons will switch from a paper file to the Azahar flower
Once you see these flowers, you are all set and ready to play!
And here is the error fix for Tomodachi life. Download this file and open it like normal. It will ask you what app you wish to open it with. Open it with Azahar.
Don't panic! A lowkey scary looking dialogue box will pop up for a moment and text will very quickly load onto it. This is Azahar reading the file and saving the commands. It will very quickly close itself. Once that window closes itself, you're all set to open Tomodachi Life and play like normal!
https://drive.google.com/file/d/1_BQfoGycmpaaOvBEm29LU1FKqy7cgG6j/view?usp=drive_link
(This is an upload from my own personal google drive account. I pinkie promise there's no virus on this. and if there is you have full permission to yell at me and put me on blast)
and that's everything I got! Feel free to reblog with other sites or tips you have! <3 Have fun lovelies!
#toby rambles#stardew valley#creepypasta#mouthwashing#hatsune miku#thats not my neighbor#animal crossing#The sims#simblr#tamagotchi#emulation#game emulator#activism#boycott nintendo#vocaloid#epic the musical#epic telemachus#epic odysseus#epic penelope#Stardew valley#stardew#sdv elliott#sdv sebastian#sdv haley
85 notes
·
View notes
Text
on the topic of writing software
I want to ramble at you about some writing software options. 98% of the time I'm perfectly content with LibreOffice Writer (and previously I used Word, back when Microsoft products were less shitty). But every now and then when I have a new project (like now - more on that later) I start looking for something shiny and new to try. And I fell down into another research rabbit hole lol
I usually don't talk a lot about this bc my needs are very simple, and not sure how useful my opinion is to others, but I enjoy the topic. It's an intersection of creative writing and tech nerdiness and I like both of those things. Also what writing software you prefer really depends on the type of writer that you are, and everyone has a slightly different writing process and I find that fascinating.
Now, as I said, I'm coming at it from a slightly tech-nerd angle. I don't care if the installation is clunky, I'm happy to see the words open-source, and the need to create an account will already mildly piss me off (:
Don't worry, I'm not as intense as the guy writing his novel in Vim. Though fucking respect. And I can't say I'm not tempted to try it even with the steep learning curve lmao (Seriously, if you don't know Vim is notorious among software developers.)
Anyway, things I've tried so far:
Manuskript: this was listed as an open-source Scrivener alternative (though I haven't tried Scrivener. so.). I gave it a go when I was writing heart worth the trouble and it was pretty nice. It helped me when I had to move scenes and chapters around. But overall I think it was made with plotters in mind bc it wants you to enter a lot of information upfront. I'm not a planner/architect type of writer so this type of software is a bit overwhelming for me. Still, the fact that it's open source and works on Linux gets kudos from me.
Wavemaker: I recently played around with this, and I actually surprisingly like the features it has. You can put multiple books in a project, which is very nice if you like to work on different things, like fanfic, novels, etc. The mindmap is a feature I liked, though it's a bit clunky bc it collapses the text fields when you exit, and once I added an image field by accident that I could never remove lol I do like a bit of a snowflake method, so that feature is cool, and the cards are pretty straightforward too. Usually, my problem with these apps is that I don't even want to touch half of the features so they are pointless to me, but the features of Wavemaker were kind of nice. It's a web app that you can download and use offline but it's still working from your browser if that makes sense. That was what I didn't really appreciate. Also, it doesn't give you a lot of options to back it up. You either save the wavemaker file, export it into a document (which is fine, but it adds an extra step to the backup process) or you sync with Google Drive *shudders*
Things I want to try out:
Calmly Writer: now this is just purely a text editor that focuses on being very zen, streamlined, distraction-free, etc. It's pretty and it has typewriter sounds. (Yeah, I'm not immune to a pretty UI and harmless fun features alright? I can contain multitudes :P) It has an online version, but you can also download it, and works on Windows, Mac, and Linux. On paper, the desktop app requires a license, but the way they put it is that you can evaluate it for free and the evaluation doesn't have an enforced time limit... So. As good as free. (Though if I really like it, I would totally consider buying a license for 20usd that I can use on 3 computers, that seems fair. I appreciate a license over a subscription model for sure.) Honestly, I think this is the one I'm going to try next bc it just integrates perfectly into my writing process. That being: a multitude of messy, hand-written notes and notebooks + a document editor + backups on hard drive and GitHub (yes, really) ^^"
Shaxpir: This is on the opposite end of the spectrum basically, but out of the "fancy" ones, I kind of like the look of this the most. I like the statistics part in particular. But honestly, I probably won't try it bc it doesn't have a Linux version which would be a pain in the ass for me, and is cloud-based. I kind of don't really trust them, which is my biggest issue with these companies. (Although the creator's heart seems to be in the right place when it comes to AI. Basically, some of their features are based on machine learning and language models. For example, it will recognize passive voice, if it's an adverb with "-ly" or the emotion of a word. Which I think is all cool and fine and shouldn't be lumped in with generative AI. But he also had a website that did this analysis for already published works, and when people pointed out that it was sketchy, he took that down and I can respect that. I'm not sure how much it influenced the actual features of the app, maybe I'll just take a peek out of curiosity. The whole thing does make me have trust issues though lmao) If anyone has experience with it though, I'm interested to hear about it.
Obsidian: not a dedicated writing software, but rather an elaborate note-taking app. I heard good things about it from smart people lol If I really wanted to access my writing on my phone, I would probably use this bc it works on every platform and has end-to-end encrypted sync with version control. I heard you can also integrate it with GitHub which is always music to my ears lol But the setup probably takes a bit of time and I'm not particularly motivated to do that right now.
So yeah, those are the options that appeal to me right now. If anyone used these and has opinions, I'm all ears :D
137 notes
·
View notes
Text
It's a common misconception in the amateur Linux/Unix world that "Control C", AKA "intr" or "interrupt" (not to be confused with the CPU concept of an interrupt) is a keyboard shortcut. It isn't, really. Not ostensibly.
This all goes way back the very very early days of ASCII, when it was both a character set and a communications protocol. (Remember that the "II" stands for "Information Interchange".)]
ASCII defines a series of seven-bit codes, each of which has some fixed meaning. For the "printable" subset of these codes, we commonly describe this relationship as though a given code 'means' some character; but from the communications protocol point of view it's more like they 'mean' to print some character. i.e. 61h doesn't just mean 'a', it means "print 'a' and advance the cursor".
Actually, "cursor" is the wrong word to use here. We think of ASCII as something computers and only computers use, but this wasn't the case in the early days. ASCII is a telegraph code. Helpful for computers, yes, but built from the ground up to allow operators to control typewriters (teletypewriters, AKA TTYs) from across the world over the telegraph network.
That's why there are more than just printing codes. These are the "non-printing" or "control" codes, designed to control the typewriter on the other end. You're probably familiar with some of them: 20h, AKA "Space", which advances the type head but prints nothing; 0Dh, AKA "Carriage Return", which puts the type head back the start of the line; 0Ah, AKA "Line Feed", which advances the paper one line; and 09h, AKA "Tab", which advances the type head some configurable amount.
Some of them you're probably less familiar with. 07h is "Bell". It rings a bell on the receiving end, perhaps to wake them up and let 'em know a message is coming. There's 06h and 15h, Acknowledge and Negative Acknowledge. There's 01h, 02, 03h and 04 -- Start of Heading, Start of Text, End of Text, and End of Transmission. There are codes to turn on and off the receiver's peripherals like a tape punch recorder or reader. There are codes to delimit files and records. There's a backspace code! Everything you could want as a telegrapher in 1963.
We run into a problem when trying to type these control codes, though. By definition they don't really print anything, so what are we gonna put on the keys? Furthermore, there are a lot of control codes. Even if we figure out what should be on the keys it'll double the size of our typewriters to include them all! (I mean we can do it for some of 'em, like "Space" which already has a key, but "BEL"? "ACK"? "X-ON"?)
Fortunately, there's an existing solution to this kind of problem. Here's a picture of the keyboard of a Teletype Model 33, one of the first products to use ASCII, and it shows this solution:

See that "CTRL" key? Forget how you think it works.
Y'know how when you press "shift" on an old mechanical typewriter, it physically "shifts" the type basket down so you can use capital letters and punctuation marks? Like, shift-g isn't a "keyboard shortcut" for 'G" so much as "how you type 'G'". It selects between map layers, makes it so you don't need to have two keys for every letter.
Control does the same thing. Control-g is not a "keyboard shortcut" for ringing the bell, it's how you type "ring the bell".* Control-f is how you type "Acknowledge", control-s is how you type "turn off the tape reader", and so on and so on. All in the same way that shift-4 is how you type '$', and w is how you type 'w'.
So what's control-c? ^C is "End of Text". That's why it's used to end processes, alongside counterpart ^D "End of Transmission". You're not telling Linux you pressed "'control' and 'c'", you're telling you pressed "End of Text", and it knows "End of Text" means "end this process".†
If you take a look at the stty tool, you'll find that you can rebind some of these default actions. Maybe you want ^Y to be your interrupt instead of ^C. You can do that! Run stty intr ^Y in a terminal it'll do it. But you can't bind, say, control-9, because that's not a control character. Or control-., or control-page down, or "enter" on the numpad. The Linux line discipline has no idea what those are. It deals in characters, not keys.‡
That's why ^C isn't a keyboard shortcut.
*You'll commonly see these control characters transcribed with so-called "caret notation", where BEL is ^G, ACK is ^F, etc. The ^ means control, the letter indicates what key you'd press to type it.
†That's not to say that Linux interprets every control character like the spec says. ^W ("End of Transmission Block"), for example, is used for "word erase". Presumably because it starts with the letter 'w'. Under the hood it's still interpreting the keys you pressed as "End of Transmission Block", though.
‡You might wonder how the arrow keys work, then. You can think of them like macros. "Up" for example will type "^[[A" -- that's three characters, '^[' AKA "Escape", '[' AKA "Left Square Bracket", and 'A' AKA "Latin Capital Letter A". "Down" is "^[[B", "Right" is "^[[C", and "Left" is "^[[D". These work...sorta like printf formatting strings. '^[' tells Linux that next couple characters contain control information and not their usual meanings. Read more about this here.
103 notes
·
View notes
Text
"how do I keep my art from being scraped for AI from now on?"
if you post images online, there's no 100% guaranteed way to prevent this, and you can probably assume that there's no need to remove/edit existing content. you might contest this as a matter of data privacy and workers' rights, but you might also be looking for smaller, more immediate actions to take.
...so I made this list! I can't vouch for the effectiveness of all of these, but I wanted to compile as many options as possible so you can decide what's best for you.
Discouraging data scraping and "opting out"
robots.txt - This is a file placed in a website's home directory to "ask" web crawlers not to access certain parts of a site. If you have your own website, you can edit this yourself, or you can check which crawlers a site disallows by adding /robots.txt at the end of the URL. This article has instructions for blocking some bots that scrape data for AI.
HTML metadata - DeviantArt (i know) has proposed the "noai" and "noimageai" meta tags for opting images out of machine learning datasets, while Mojeek proposed "noml". To use all three, you'd put the following in your webpages' headers:
<meta name="robots" content="noai, noimageai, noml">
Have I Been Trained? - A tool by Spawning to search for images in the LAION-5B and LAION-400M datasets and opt your images and web domain out of future model training. Spawning claims that Stability AI and Hugging Face have agreed to respect these opt-outs. Try searching for usernames!
Kudurru - A tool by Spawning (currently a Wordpress plugin) in closed beta that purportedly blocks/redirects AI scrapers from your website. I don't know much about how this one works.
ai.txt - Similar to robots.txt. A new type of permissions file for AI training proposed by Spawning.
ArtShield Watermarker - Web-based tool to add Stable Diffusion's "invisible watermark" to images, which may cause an image to be recognized as AI-generated and excluded from data scraping and/or model training. Source available on GitHub. Doesn't seem to have updated/posted on social media since last year.
Image processing... things
these are popular now, but there seems to be some confusion regarding the goal of these tools; these aren't meant to "kill" AI art, and they won't affect existing models. they won't magically guarantee full protection, so you probably shouldn't loudly announce that you're using them to try to bait AI users into responding
Glaze - UChicago's tool to add "adversarial noise" to art to disrupt style mimicry. Devs recommend glazing pictures last. Runs on Windows and Mac (Nvidia GPU required)
WebGlaze - Free browser-based Glaze service for those who can't run Glaze locally. Request an invite by following their instructions.
Mist - Another adversarial noise tool, by Psyker Group. Runs on Windows and Linux (Nvidia GPU required) or on web with a Google Colab Notebook.
Nightshade - UChicago's tool to distort AI's recognition of features and "poison" datasets, with the goal of making it inconvenient to use images scraped without consent. The guide recommends that you do not disclose whether your art is nightshaded. Nightshade chooses a tag that's relevant to your image. You should use this word in the image's caption/alt text when you post the image online. This means the alt text will accurately describe what's in the image-- there is no reason to ever write false/mismatched alt text!!! Runs on Windows and Mac (Nvidia GPU required)
Sanative AI - Web-based "anti-AI watermark"-- maybe comparable to Glaze and Mist. I can't find much about this one except that they won a "Responsible AI Challenge" hosted by Mozilla last year.
Just Add A Regular Watermark - It doesn't take a lot of processing power to add a watermark, so why not? Try adding complexities like warping, changes in color/opacity, and blurring to make it more annoying for an AI (or human) to remove. You could even try testing your watermark against an AI watermark remover. (the privacy policy claims that they don't keep or otherwise use your images, but use your own judgment)
given that energy consumption was the focus of some AI art criticism, I'm not sure if the benefits of these GPU-intensive tools outweigh the cost, and I'd like to know more about that. in any case, I thought that people writing alt text/image descriptions more often would've been a neat side effect of Nightshade being used, so I hope to see more of that in the future, at least!
246 notes
·
View notes
Text
What happens when you start your computer ? ( Booting a computer )
We studied this in the lecture today, and it was quite interesting. What makes something a hundred times simpler than it is? Creating a story about it. That's why I made this super fun dialog that will help you understand it all.
I've set up a drive to compile everything I create related to the Linux operating system. Feel free to explore it for more details on the topics discussed in the conversation below. Check it out here.
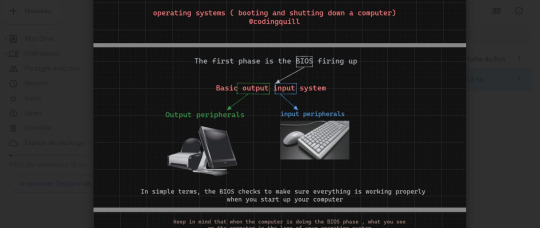
Have a fun read, my dear coders!
In the digital expanse of the computer, Pixel, the inquisitive parasite, is on a microventure with Binary, a wise digital guide. Together, they delve into the electronic wonders, uncovering the secrets hidden in the machine's core.
Pixel: (zooming around) Hey there! Pixel here, on a mission to demystify the tech wonders . There's a creature named Binary who knows all the ins and outs. Let's find them!
Binary: (appearing with a flicker of pixels) Pixel, greetings! Ready to explore what happens inside here?
Pixel: Absolutely! I want the full scoop. How does this thing come alive when the human outside clicks on "start"?
Binary: (with a digital chuckle) Ah, the magic of user interaction. Follow me, and I'll reveal the secrets.
(They traverse through the circuits, arriving at a glowing portal.)
Pixel: (inquiring) What's the deal with this glowing door?
Binary: (hovering) Pixel, behold the BIOS - our machine's awakening. When the human clicks "start," the BIOS kicks in, checking if our components are ready for action.
(They proceed to observe a tiny program in action.)
Pixel: (curious) Look at that little messenger running around. What's it up to?
Binary: (explaining) That, Pixel, is the bootloader. It plays courier between the BIOS and the operating system, bringing it to life.
Pixel: (excitedly buzzing) Okay! How does the computer know where to find the operating system?
Binary: Ah, Pixel, that's a tale that takes us deep into the heart of the hard disk. Follow me.
(They weave through the digital pathways, arriving at the hard disk.)
Pixel: (curious) Huh? Tell me everything!
Binary: Within this hard disk lies the treasure chest of the operating system. Let's start with the Master Boot Record (MBR).
(They approach the MBR, Binary pointing to its intricate code.)
Binary: The MBR is like the keeper of the keys. It holds crucial information about our partitions and how to find the operating system.
Pixel: (wide-eyed) What's inside?
Binary: (pointing) Take a look. This is the primary boot loader, the first spark that ignites the OS journey.
(They travel into the MBR, where lines of code reveal the primary boot loader.)
Pixel: (in awe) This tiny thing sets the whole show in motion?
Binary: (explaining) Indeed. It knows how to find the kernel of the operating system, which is the core of its existence.
(They proceed to the first partition, where the Linux kernel resides.)
Pixel: (peering into the files) This is where the OS lives, right?
Binary: (nodding) Correct, Pixel. Here lies the Linux kernel. Notice those configuration files? They're like the OS's guidebook, all written in text.
(They venture to another partition, finding it empty.)
Pixel: (confused) What's the story with this empty space?
Binary: (smirking) Sometimes, Pixel, there are barren lands on the hard disk, waiting for a purpose. It's a canvas yet to be painted.
Pixel: (reflecting) Wow! It's like a whole universe in here. I had no idea the operating system had its roots in the hard disk.
(They continue their microventure, navigating the binary landscapes of the computer's inner world.Pixel gazes at the screen where choices appear.)
Pixel: What's happening here?
Binary: (revealing) This is where the user picks the operating system. The computer patiently waits for a decision. If none comes, it follows the default path.
(They delve deeper into the digital code, where applications start blooming.)
Pixel: (amazed) It's like a digital garden of applications! What's the enchantment behind this?
Binary: (sharing) Here, Pixel, is where the applications sprout to life. The operating system nurtures them, and they blossom into the programs you see on the screen.
Pixel: (excited) But how does the machine know when the human clicks "start"?
Binary: It's the BIOS that senses this initiation. When the human triggers "start," the BIOS awakens, and we embark on this mesmerizing journey.
#linux#arch linux#ubuntu#debian#code#codeblr#css#html#javascript#java development company#python#studyblr#progblr#programming#comp sci#web design#web developers#web development#website design#tech#html css#operatingsystem#windows 11
387 notes
·
View notes
Note
Hello! Sorry for the bother but do you know how the live 2D files of Tokyo debunker is accessed? I'm like so hyped about this help- Let me know if you could answer for me! THANK YOUUUU
I'm on the way to work so I'll just copypaste what i sent to someone else over DMs. Lmk if you run into any trouble, but it'll be like 8+ hours before I get to it
Hiya! No need to apologize for the sudden message. I just woke up so sorry for the wait!
I can explain the process for you and get screenshots to hopefully help out, and if you have any problems with it you can let me know!
You'll need:
An android phone and a way to transfer files between your phone and computer(a wire is preferable in my experience)
I think you need a windows or linux computer? I'm not sure if the necessary programs will work on mac.
AssetStudioGUI https://github.com/Perfare/AssetStudio
UnityLive2DExtractor https://github.com/Perfare/UnityLive2DExtractor/releases/tag/v1.0.7
First you'll need to transfer the game files to your computer. I assume you already have that part done so I won't walk you through it.
Next go into AssetStudioGUI and go into 'Debug' and turn off 'Show error message' to save yourself some headache
Now you need to open the folder with the files in AssetStudio. This will probably take a long time. Get yourself something to eat or play a game or read or something!
Once everything is loaded you'll need to find one of the live2d files. For tokyo debunker the easiest way to do this is just to go to "Filter Type" and filter to "Texture2D". I don't know the file structure or naming convention for Twst, but the image you're looking for should look kind of like this

Right click and choose "Show original file".
Copy the FOLDER that this file is in to another folder.
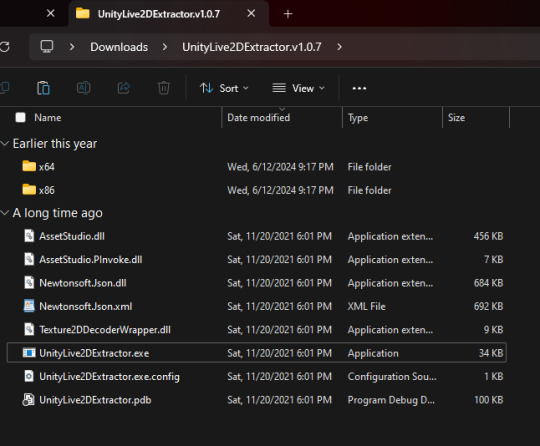
If you haven't already extracted L2DExtractor, do that now. You should have these files.
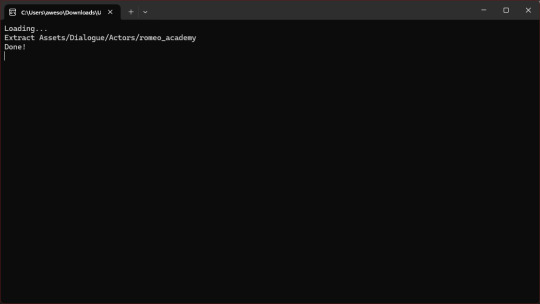
Open the L2DExtractor FOLDER in another tab or window. Then drag the folder that you copied before to "UnityLive2DExtractor.exe" in the UnitLive2DExtractor folder that you have in a separate window. (You can also copy it and right click→paste it INTO THE EXE FILE if dragging is difficult.)
You should get a command prompt(the black box with text in it) with the name of the asset in it. Wait until it says "Done!" Close the command prompt.
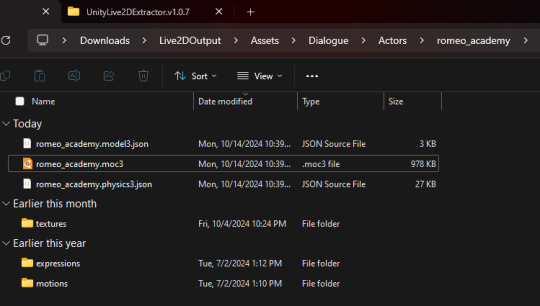
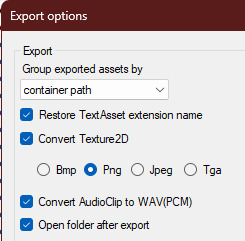
Go to the folder that you put the asset folder in. You should now have a new folder named "Live2DOutput". That will have a folder in it. Go into the folder until you find the asset you just extracted.
You should now have the .moc3 file, textures, and motions! You can open the moc3 file with Live2D's Cubism Viewer which you get off of their website. It's free.
If you don't have the expressions in there you'll have to extract them separately! I always have to extract them separately and I'm not sure why, but it's easy enough once you know where they are.
Open AssetStuido back up and change your filter to "MonoBehavior"
Search "exp3"
Order by Container and find the character character and outfit you just extracted(in this case I just need to find "romeo_academy". The name of the asset you extracted should be in the container path.
Highlight only the .exp3 files that go to this asset.
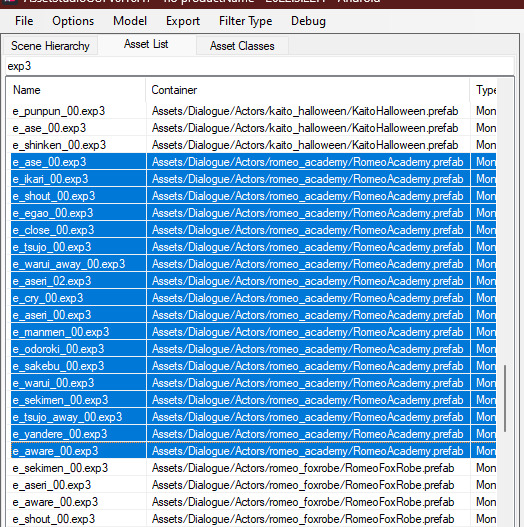
Go to "Options→Export options"
Change "Group exported assets by" to "Do not group". If you want to do any datamining in the future you're probably going to want to change this back to "container path" or else you'll just get a ton of files in one folder, so don't forget you did this! If you're only using assetstudio to get the l2d files however you can leave it as is.
Press "OK"
Right click on one of your highlighted exp3 files
Choose "Export selected assets"
Navigate to the folder with the moc3 file in it. Make a new folder. The name doesn't matter because you'll have to manually move the expressions into l2d every time, but I just use "expressions" for simplicity
Extract the exp3 files into here.
Once they're extracted you can select them all at once and drag them into the Cubism Viewer window OF THE CORRECT CHARACTER. This will instantly import all of the expressions.
You're done! You can view and play with them all you want. But you'll have to do every character individually and then export their expressions separately.
Hope that helps. If you need anymore help let me know.
#ridiculous-reina#danie yells answers#do i have a tag for explaining this stuff? idr.#datamining cw#just so it'll come up if i search datamining or something ugh
20 notes
·
View notes
Text
UBUNTU TOUCH | DAY ONE
If you didn't see one of my previous posts, I've got a phone to experiment with, and I'm gonna be trying out various mobile operating systems! (Primarily linux based! Not that android isn't linux but lets be real.) please ignore my greasy ugly hand Installation Process: The installation actually wasn't that bad! Was kinda awkward trying to get the phone updated to the correct version without upgrading too far, but after that was dealt with everything else was taken care of very smoothly and easily with the UB Ports custom installer! Didn't have a fail state, nor did the phone brick! I'd rate this an 8/10! Setup and Tutorial: Setting up the phone after the install was very fast, frankly there wasn't much to set up. Thankfully it's not like Google or Apple where they ask for your firstborn son before even asking for your SIM card. Just needed to set up a password/passcode, set up my SIM (Which was thankfully automatic kinda, details later) and confirm a Wi-Fi connection if I wanted to!) Tutorial however, was a bit lackluster. While it was descriptive, it also only popped up on my first time seeing each screen. (E.g. I didn't get the tutorial for the phone app until I opened the phone app.) While I don't think this is necessarily a bad thing, it also means I would need to walk through every inbuilt app to make sure the tutorials are all done. kinda annoying in my personal opinion. Overall I'd rate this 6~7/10. Usage and Experience: For day one this isn't super important, however first impressions do matter for most people. The OS as a whole was very snappy, and never froze or lagged in any of my testing. Additionally, the pull-down shade is very nice! Could be simplified a little more so that you don't need to scroll sideways, and it would also be nice to see more settings overall since the system seems to be quite bare for settings at the moment. However one of the things that really bothers me as a button-enjoyer is the OS not having a button navigation method. The only way to navigate between screens is to swipe from the sides, top or bottom as gestures, similar to Apple and the recent Android iterations. These gestures don't even work perfectly either, which makes it more annoying that I don't have a home button or back button. If there is a home-swipe or back-swipe, then the tutorial did not detail it, and I cannot find it anywhere in the settings. Overall, it's a 4/10 but with LOTS of potential! Functionality: This focus' almost entirely on how it functions as a phone, and if it's problematic for any reason. So far it seems great outside of one issue, as commented on earlier (This is the details later bit lmao). Plugged an active SIM card into the phone and it automatically logged the APN and other important information which was very nice. Tested the mobile data and texting, and found no issues except for maybe being unable to send MMS (Need to double check that it was not a file size issue.) However, this entire time I've not had the ability to make or take calls. I'm not sure why, the APN, provider, and everything in the settings is correct to what I can tell. I may attempt to either reinstall the dialer application, or erase and manually set the APN in the event that might fix it. If I cannot get calling to work this score will look a lot uglier. Overall, it's a 7~8/10! for now.
App Availability: Seems great! The built in app-store, or "OpenStore" is pretty cool, and seems to have a lot of useful apps. I did notice a small fraction of android apps that I could use (Like Slack, thanks workplace -ﻌ-) but they were just WebUI apps, which isn't bad, but it's bad. I haven't attempted to set up or use Waydroid, but I will not have that change the score at all since using Android apps (kinda barely) defeats the purpose of an alternative operating system. Overall score, 8/10, but needs a deeper dive.
I'll likely put out another update at either 15 days or 30 days!
Whenever you guys think you want one!
8 notes
·
View notes
Text
Akello Chapter 2 Devlog

Akello's second chapter is out on Steam! Additionally, you can find TCM on the itch.io page too! As always, much love to my beta testers who work very hard to make sure shit works! I wanna give a shoutout to @cvnvryarts for letting me bounce Raath prototypes and designs around with them for the last few years, they really helped me refine his visuals especially.
Changelog - Here's what got updated besides story content:
Removed Discord Rich Presence for the time being. The base tool had not been developed with Linux users in mind and had some fairly significant stability issues. On top of that, it added a not-insignificant amount of endless loop crashes going between in-game and menu navigation in other builds. Because of this, I've decided to pull the feature for now. It may return after more thorough Linux testing and general stability tweaks happen.
I had a couple users still running into issues with the game crashing because pronouns weren't correctly saved as persistent data from earlier chapters so I added how to fix this in the FAQ post.
For reference, this glitch doesn't affect users who started playing after update 0.3.0 or any new playthroughs started after that point now the player can't get back into the story via Chapter Select or Load without requiring default MC data stored.
HOWEVER, if you're running into crashes at specific points, the first thing to do is make sure your MC's name, pronouns, and body are entered in the Options menu before jumping back into the story. Exiting the Options menu will save that data as persistent (for reals, this time!) and you should only have to do this once to fix the issue.
New Achievement
Learned not to set up Achievement Back End before game is updated! (It shows up as an unearned Achievement for users and it drives people batty. OOPS sorry, I wanted to test and make sure it worked)
File structure cleanup on the back end to keep things organized
Reorganized some bookmarks and their flags, got rid of a doubled up one for Akello
Fixed Raath getting unexpectedly shorter in Mori's Chapter 1
Typographical and Stylistic Adjustments to text
New animated bg
New backgrounds, music tracks, and sfx
UP NEXT: Amir Chapter 2
#gamedev#indie game dev#visual novel#renpy#devlog#the trials and tribulations of#make one oversight with persistent data and it will haunt you forever lmfao
19 notes
·
View notes
Text
Clarity trumps efficiency.
*I would've liked to write this essay to be understandable for someone without a programming/Linux background, but it was a bit too difficult. If you skip to the paragraph beginning with "...", it gets a bit easier from then on.
If you’ve ever written your own shell scripts you may have heard of the phrase “useless use of cat*”, or less tactfully, “cat abuse”. This refers to the practice, common among new shell script enthusiasts, of writing commands like “cat file.txt | grep name”, when “grep name file.txt” would serve perfectly well. Tools like shellcheck will bug you about it—along with similar constructions like “ps ax | grep Discord | wc -l” instead of “pgrep -c Discord”.
Well, I’m here to defend cat abuse! There are two arguments I see against the cat | grep construction, one of which is valid but situational, and the other of which is completely invalid. The former is that the extra pipe just adds additional overhead into the command. Yes, it does. And it’s unlikely to matter at all if you’re using it on 20KiB text files on a system built in the past 40 years; however, in production, when writing tools that need to be able to deal with arbitrarily large text files as efficiently as possible, sure.
The latter is “well, it’s just unnecessary”. I disagree. I think the cat | grep construction—along with similar such as grep | wc, ps | grep, ps | awk, and so on—serves a very important purpose in that it makes shell scripts easier to read, easier to modify, and easier to debug.
Consider this example from above:
ps ax | grep Discord | wc -l
Read the process table; filter for "Discord"; count the number of lines. It’s very atomic. Each operation can be swapped out for something else without confusing the reader. On the other hand:
pgrep -c Discord
Now, this does the same thing—counting the number of lines in the process table with "Discord" in them. It looks like only one operation... but it’s really still three in disguise. And worse, imagine you suddenly want to add another filter; sorting not only by Discord, but by processes that include the word “title”. This is not straightforward at all! It turns out that while regex has a standard way of searching for alternatives, it really does not provide an easy method for searching for BOTH of two words. On the other hand, with the atomic version, it’s easy:
ps ax | grep Discord | grep title | wc -l
Take that, “useless” use of cat.
There’s a broader meaning, though, to my statement of “clarity trumps efficiency”. I apply it to every aspect of use of electronics, from web searches to backup routines to yes, silly little shell scripts that use cat.
I use command aliases, but to a pretty limited degree; I avoid cutesy stuff like “ll” for “ls -l” and “yeet” for “pacman -Rns”, along with possibly-dangerous substitutions like “rm” for “rm -i”; I’d never dream of aliasing “nano” or “vi” to my preferred text editor (vim). I believe strongly that my commands should be transparent, and saving me from my own muscle memory once or twice is not worth making them completely opaque.
Tab completion on the other hand is one of my favorite features in the shell. It’s the perfect combination of transparent and convenient; without having to alias any of my application names or get hit by the information overload fuzzy finding gives you, I can still launch any of them in no more than four keystrokes. (Except audacious and audacity, admittedly.)
I use a floating window manager (Openbox), and when I need to briefly use a tiling layout, I have a very boring way of doing so: focusing each window one by one and moving it into the slot I want. (While holding down the Super/Windows key, 1-C-2-V does a basic left-right split.)
... I make some use of spellcheck on assignments to be turned in, but never autocorrect, which I abhor even in messaging apps. Every change to your inputs should be deliberate; otherwise you’ll never learn what you’re doing wrong, and you’ll never need to be precise because you’ve turned over that part of your brain to the algorithm.
This leads me to an important corollary of my principle: “it’s better to have a slow algorithm that you understand, than a fast one that you don’t”.
Satya Nadella’s vision of the PC of the future is one where you tell it what to do in natural language and it interprets that using LLMs and so on into machine instructions. Instead of viewing a PC as a toolbox you go into the workshop with, and work on projects with in certain defined ways, he wants the PC to be an assistant; you give the assistant directions and pray that it gets things right. Of course you aren’t allowed into the workshop with the tools anymore; that’s the assistant’s job!
Anyone who’s used Google Search over the past ten years knows how miserable this model is; you search for a specific phrase that Google “helpfully” corrects to something it thinks you meant. There was a learning curve to the old way, but once you learned how to state queries precisely, you were done; now you need to play psychologist, sociologist, and statistician all at once.
This is a decent part of why I dislike generative AI, though far from the main reason. I don’t want an opaque algorithm making decisions for me, unless those decisions are incredibly low-level stuff like core parking that no human should be directly involved with in the first place.
To get back to my own setup, I have a whole text file documenting the system maintenance process I go through once every month; most of it could be automated, but I make every step a deliberate choice. Not to go all new-age, but for me specifically—it all ties back in to mindfulness.
I think people have only a vague concept of what mindfulness is. Until two years ago or so, I was the same way. But to who I am now, mindfulness means not doing anything on autopilot. Instead of letting yourself half-doze off on a drive home, scarcely remembering the 20 minutes from the parking lot to the garage, be conscious of every turn. Instead of immediately putting on music and blocking out the world on a train ride to the next city, force yourself to be present in the train car, and notice the way the light reflects on the plastic seat two rows in front.
And to me, clarity in code, and in UX, is a part of this mindfulness. Programs that are easy to read, easy to modify, and easy to debug encourage you to look closer—to consider every atom that goes into their statements instead of taking them for granted. Slow algorithms that you understand can help you think of improvements; fast algorithms that you don’t encourage you to give up and leave the real thinking to someone else.
So write silly little shell scripts with five pipes in a single statement, and yes, that uselessly use cat. Rather than doing anything wrong—you’re allowing yourself and others to think, to try, and to improve.
#programming#linux#mindfulness#i would have gotten deeper into spirituality in this essay but i think it would've scared anyone off#might post on another site#shell script
12 notes
·
View notes
Text
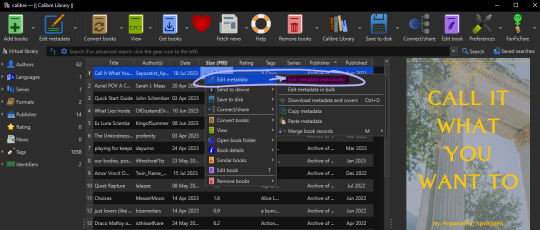
How I download fics and give them covers before sending them to my Kindle.
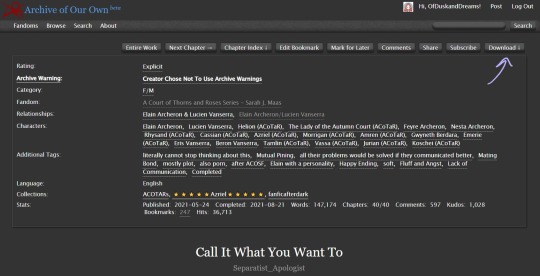
Hi all, I've been considering making a post about this for a while and now seems as good a time as any. I'm not an expert, and there is more than one way you can do this; I'm just going to show you my process using "Call It What You Want To" by @separatist-apologist as an example. [This will only work on computers FYI.]
Part One — Getting Started
Download Calibre (it's free.) Calibre for PC. Calibre for Mac. They also have it for Linux but idk if that's still relevant.
Follow the program's setup instructions, and then those for wirelessly connecting Calibre with your Kindle account. Alternatively, you can connect your Kindle/e-reader to your computer with a cable and transfer files manually or download the file to your hard drive and share it another way. I highly recommend taking a few extra minutes to set up the wireless sharing as I think it's far more convenient.
Create a folder in which to store fanfiction downloads so that you can be an organized human.
Part Two — The Fanfiction
Find the fic you want to download on ao3 and click it so that you're on the fic's first page.
Above the box of metadata (ratings, warning, tags, etc.) on the far right click the "download" option. When prompted to select a file type, choose "MOBI."
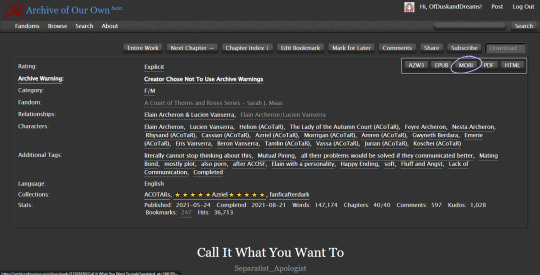
Note: Though ao3 has an "EPUB" option I've noticed a bug that removes the chapter navigation from the fic when downloading the EPUB directly from ao3. If you enjoy the "x minutes left in this chapter/book" feature on your e-reader, you will want to download "MOBI" and we will be converting it later in Calibre.
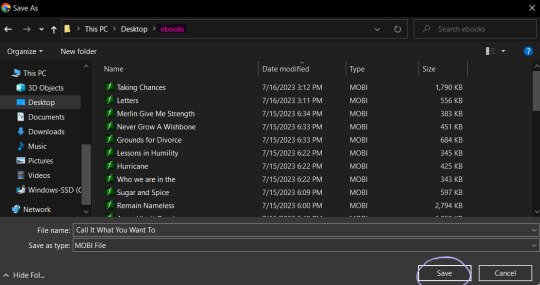
Save the file to the folder you created.
Launch Calibre if it isn't already running.
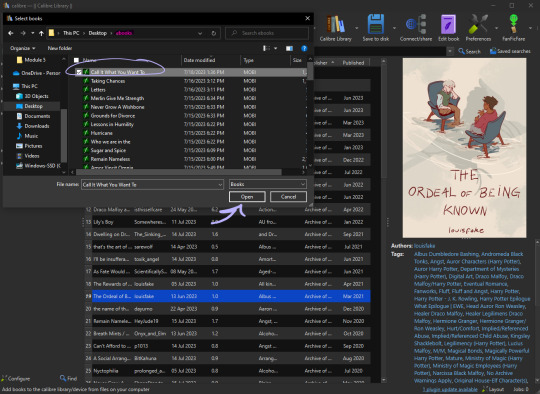
In Calibre, click "add books" on the toolbar at the top of the screen.
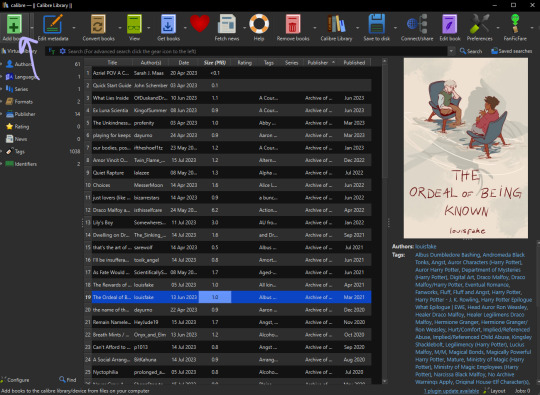
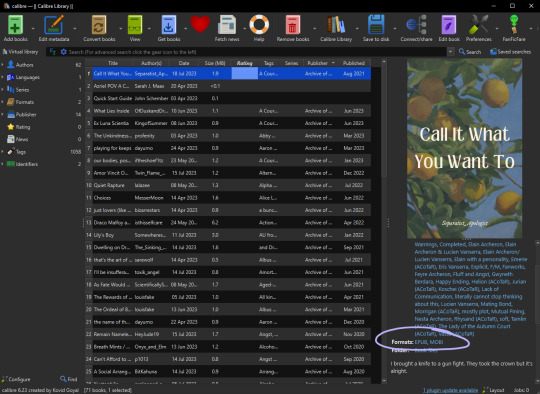
Navigate to the folder you saved the fic in, select the fic, then click "open." Calibre will import the MOBI file to your library.
Now as you can see, "Call It What You Want To" already has a cover when we imported it to the library. That is because the cover image is embedded in the fic on the archive. Some fics will already have covers embedded such as this one.
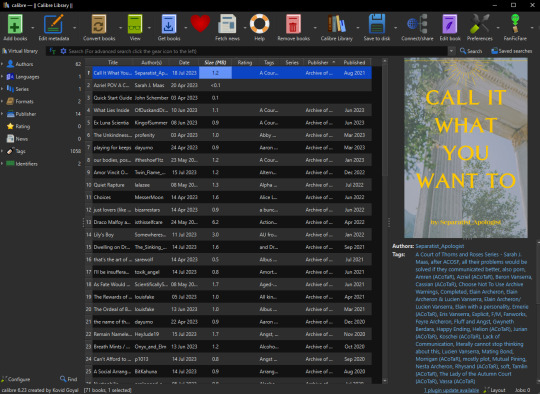
Calibre is not a genius. If there are multiple images in the fic it will usually take the first one and default it to the cover. In the next section, I will go over how to add/change the cover of a fic in Calibre and how I like to create them.
Note: Even if the fic doesn't have embedded images, covers may have been made by readers and linked to the fic either in the notes or related works sections so it's worth checking if a cover already exists. If a fic is popular enough, a Google search of the fic's title + "cover" or "cover art" will show you if there have been covers already created for it.
Part Three — Making The Cover (I use Canva)
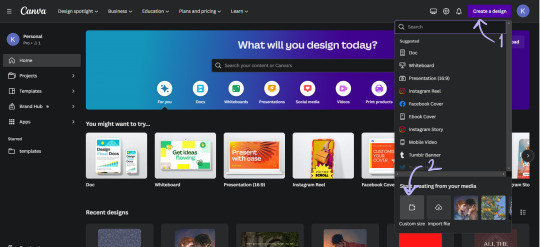
On the Canva homepage click "create a design" then select the "custom size" option. Canva does have a book cover template but I've found that it's awkwardly tall compared to the default size for Kindle books so I make my own.
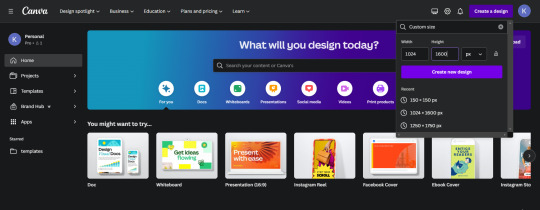
I set the dimensions of the design to be 1024 pixels wide, and 1600 pixels tall, then click "create new design."
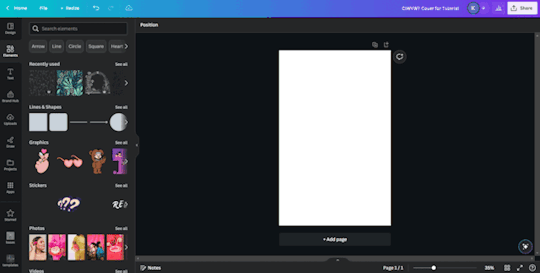
This is where you can get creative, make whatever you want. These basic steps are shown in a gif at the bottom of the section:
One: Choose a background image (you'll want to make sure it's a high enough quality that it won't be pixelated.) I used an image I had already uploaded into Canva, but you can use whatever you would like.
Two: On the sidebar, select "elements" and then "rectangle."
Three: Make sure the rectangle covers the whole design, then change the color. I like using the colors from the photo that Canva suggests and then making them a darker shade. Once you have the color that you want, reduce the transparency of the rectangle to anywhere between 40-50%. (This step ensures that the text we put on top of the image is easily legible, play around with it a bit.)
Four: On the sidebar, select "text" and then "add a text box." Then type in the author's username and change the font, the color, and the size until you like it. Repeat the same steps for the fic's title. I like to center the title on the page and put the author toward the bottom but that's just my preference.
Once your cover looks the way you want it to, click "share" at the top right and follow the steps to download the file as a PNG. I usually just save the image to my desktop so I can grab it easily once I'm in Calibre.
Part Four — Adding the Cover in Calibre
In your Calibre library, hover over the fic and right-click. Then hover over "edit metadata" and click "edit metadata individually."
On the "edit metadata" screen, find the section that says "change cover" and click "browse."
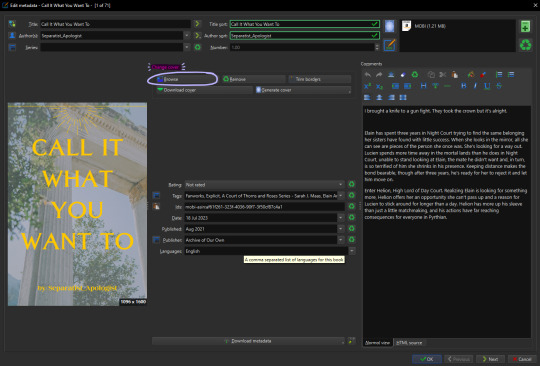
When the file upload dialog box appears, navigate to the PNG you just saved from Canva, select it, and click "open." This will add your cover to the fic. You can use these same steps to add any cover image that you've saved to your computer.
Make sure to click "ok" at the bottom of the screen to save your new cover and navigate back to the library page.

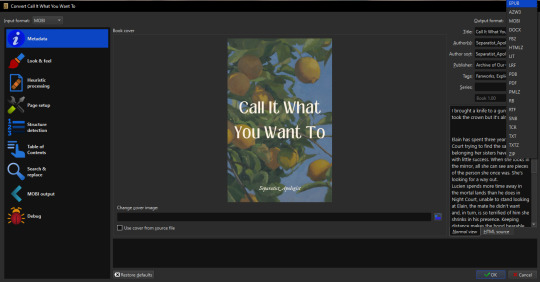
Part Five — Converting to EPUB
In your Calibre library, select the fic and then click "convert books" on the toolbar. At the top right of the converting screen, set the "output format" to "EPUB."
Now, the following steps are unnecessary little things I do to make my reading experience more seamless.
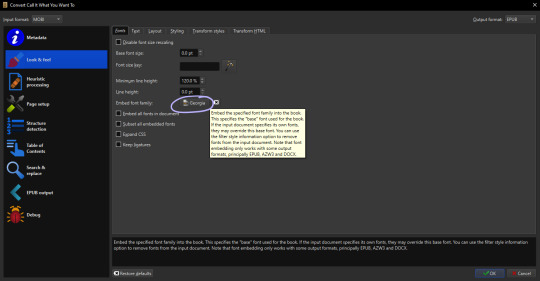
Click "Look & Feel" on the left sidebar. Under the "fonts" tab, I embed the "Georgia" font family. I do this because I prefer reading in Georgia which is not a default option on my PaperWhite*. I have my Calibre conversion settings in place to do this automatically. You can embed any font that you have on your computer.
*It might just be me, but when opening a downloaded fic (following the methods in this post) for the first time on my Kindle the font is always weird. The trick to fix it is to go and change the font from whatever is selected (Baskerville in my case) to "publisher's font" and then I've found that switching it back to "Baskerville" on the font selection screen activates the embedded Georgia... even though it will say that it's Baskerville? Idk why this is, I just wanted to let you know how I fix it.
Calibre defaults to a justified text alignment unless you change the default settings. This appears as "original" in the alignment options. The random too-large spaces between words of a justified alignment give me the ick so to make everything left aligned, I stay on the "look & feel" page but move to the "text" tab where I can change the alignment.
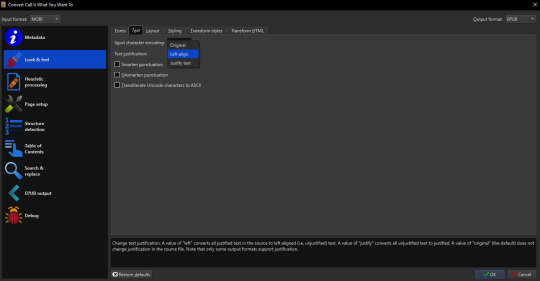
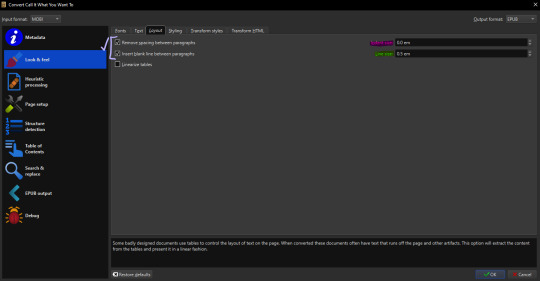
Staying on "look & feel," move to the "layout" tab. To ensure even paragraph spacing regardless of how it appeared on the archive, I select both the "remove spaces between paragraphs" and "insert blank line between paragraphs" options.
On this page, you can also change the indent size of the first line of every paragraph (highlighted pink,) and the size of the blank lines Calibre will insert between paragraphs upon conversion (highlighted green.) I set the indent to 0.0 and leave the line size 0.5 which is the default.
The last thing I do is go to "EPUB output" on the left sidebar and check the box labeled "insert inline table of contents." This just means that Calibre will add a table of contents to the beginning of the EPUB. (By default it puts the TOC at the end which I don't like.)
When everything is set as you'd like it, click "ok" on the bottom right and Calibre will convert the MOBI file you downloaded from ao3 to an EPUB containing the settings we just changed. Both file types will appear in your library when you click on the fic and scroll within the right-side window. I usually delete the MOBI format after I have the EPUB because I don't need it any longer.
And you've done it! Now all you have to do is either right-click and share it to your Kindle, or you can "save to disk" and download the EPUB file to transfer to your e-reader by a method of your choosing.
I hope someone finds this marginally helpful. In truth, I was just bored so I made this post but in light of the recent DDoS attacks against ao3, I think everyone should look into downloading their favorites so that you're never left out in the cold again.
Happy fanfic downloading <3
#fanfiction#acotar fanfiction#ao3#archive of our own#download fanfiction#downloading fanfic#calibre#fanfic#fanfiction cover#how to guides#fanfiction on ao3#fanfiction on kindle#read fanfiction#fandom things
126 notes
·
View notes
Text
How to Find Files with Specific Text on Linux
15 notes
·
View notes
Text
Steam Deck Obtain~~~~
I FINALLY HAVE THE THING IN MY POSSESSION~~~
STEAM DECK LET'S FREAKING GO~~~~~
and instead of playing games; I'm driving myself up a wall trying to get SA2 modded to look like the dreamcast version of the game.
I've installed hopefully all the correct .net frameworks and everything but the mod loader either won't find the game, find the mods or what...
do I have to find the game directory through proton's emulation of windows? where do I find that? I can't read the text T_T;;; I've found it in dolphin in a hidden folder~~ but idk how to find it on the small windows emulation window
hope I get it eventually tho cause dreamcast graphics look better imo despite growing up w the gamecube version...
I should go to bed but I wanted to figure this out given I've spent the ENTIRE DAY for the most part trying to figure it out.....
next thing I'm doing is installing emu deck~~~ cause emulation would be nice~~~
and you tell me THAT'S an LCD screen? it looks just as good as the oled switch to me~~~
wish I had the know how to get the prod keys from my switch and to dump my physical game roms cause I think emulating the switch on the steam deck would be so awesome~~~~
I should go to bed tho so I don't wreck what current pattern I got going on lol
like how tho? I got sonic adventure fully decked out to look like the dreamcast, but it's also got an installer that's all in one so to speak.
for SA2 I CAN'T EVEN GET THE MOD LOADER TO WORK~~~~ >:(((
I've installed all the necessary .net frameworks and c++ and idk what all other dependencies the windows programs needs to run under proton or wine....
would ask if I'm stupid but I'm not~~~ I"m not used to modding games in general, especially under linux~~~
I just want to get the mods to work~~~
also steam deck hype~~~ next stop emu deck for emulation~~~
I know where the game exe i need to use in there is, but I can't get to it cause it's in a hidden folder in linux and i don't think that the windows item search thing can even see it at this point. how am I going to input my game into the mod loader??
aside from errors I finally got the mod loader for sadx/sa2b to work in the sa2b folder but now I can't find the game that I want to mod cause it's in a hidden folder. I can get to it cause that's where the mod loader is, and where the mods I wanted to use are....
how do I get into that with proton??
I need sleep lol sleepy and still driving myself up the wall cause I want to make it work
all I know now is that it wants me to run a windows program as admin under linux to do the install mod loader thing~~
followed a steam guide but feel somehow I did it wrong or something~~ idk...
it errors with "access denied" and when I go to the folder to find the game file in the installer, there's nothing there.... and it can't install cause it wants to run as admin....???
how did the mod loader for SADX work? cause it's the same one~~ all the patches and the like for that were automated~~~
:(((
#personal#thoughts#thinking#games#gamer#gaming#steam#steam deck#sonic adventure#sonic adventure 2#sonic adventure modding#sonic adventure 2 modding#idk#idk what to do#idk what do#how do I get it to work#i don't understand#I've tried the entire day at this point#just want to get the mods to work#dreamcast#switch#nintendo switch#switch emulation on the steam deck would be so dope
2 notes
·
View notes
Text
trying out Obsidian, my first setup, my opinions, etc.
Okay, so this is going to be a long post. Earlier this week I decided to give Obsidian a go to see if it would work for my longer writing projects. I heard some of my mutuals use it and others would like to see my setup, so I'm making a post about what I learned so far. I downloaded it three days ago so I'm sure things will change, but this is where I am right now.
I'm shy about my WIPs so what you see there is the beginning of heart worth the trouble. But hopefully, this lets you see my folder structure and the links in the notes.
My wishlist and how I got here
I recently wrote a rambly post about writing software which got way more notes than I expected (bc the lovely @barbex reblogged it <3). After I made that post, I started using Focus Writer (again a recommendation from the writing discord) for my discovery writing in March. After more than two weeks of heavy use, I realized I needed a little bit more than that (but it's a great program).
Initially, I tried combining it with Wavemaker bc I liked that when I played around with it, but that completely pissed me off, bc it turns out it's just not compatible with other things I'm using. Like Firefox. -.-
Still, this whole ordeal made me narrow down what I really want and need from a piece of writing software at this moment. I think it's a good idea to start with such a wishlist if you are looking for a new software. Here is mine:
free
no account required, not stored on someone else's cloud, I can back it up wherever I want instead
Linux support
widely compatible file formats
focus mode, where it's full-screen, and ideally highlights the paragraph you are working on
I can make it look nice and calming on the eyes currently all I want is a cream paper background look, and a friendly monospace font changed to brown or something
clicky keyboard/typewriter noises - luckily I got this covered by Mechvibes already!
something like the card feature in Wavemaker, where I can have individual notes and choose to display them on the side. this might sound like it conflicts with the focus mode but I just want to have the option to have some notes without having to vomit them into the draft
easy to rearrange the order of the scenes
wordcount obviously
Tall order? Weird order? Maybe.
I think the most important is to figure out is how you work as a writer and find tools that match that. This is just honestly what is important for me right now.
It seems like Obsidian might just do this.
it's free
doesn't require an account
text is stored locally in markdown files
works on Linux I'm using the AppImage if you want to know
can be integrated with Github for backup & sync
tons of customization options to achieve the rest of my requirements
The Basics
If you want to use Obsidian for note-taking (or for writing fic but you're not very picky about the how), you can pretty much just download it, pick a pretty theme if you want and you're good to go. It's that easy. I promise it's not as hard as people make you believe.
This is a local-first software, which I love. However, this also means if you are not used to storing your writing locally, you need to get into the habit of backing your things up because if something happens to your computer, there is no copy of your files on the web.
That said, you can pay I think 4USD/month for the subscription and then you'll have an account, and your files will get synched to other devices, and you can restore your files. (And remember, if something is free and doesn't have ads and you have cloud storage space you didn't have to pay for... then you are the product and the company is paying for it with your data. So the fact that this is paid is actually a very good thing.)
The file structure works pretty much 1:1 as your file explorer btw
If you create a folder on the sidebar, it will create a folder on your computer.
If you create a note on the sidebar, it will create a text file on your computer.
If you drag the note into the folder on the sidebar, it will put the text file in the folder on your computer.
Each note is stored as a separate markdown file. Markdown files are widely compatible with various software so that's great. Also, you can even just rename the file to have .txt extension instead of .md extension and literally every text editor will open it for you (you will lose the formatting tho). The opposite also works. If you have a note in .txt format, you can copy it into your Obsidian folder, rename the extension to .md and it will appear in Obsidian.
That all makes it very easy to import things and switch between files to edit them.
There is only one downside to this that I found. You know how in your file explorer you can drag and drop files into folders but you can't drag and drop files to change their order? Well, your Obsidian side-bar is the same. You can choose to order them based on the name, last modified, etc. But if you want custom order, I suggest you number your notes and folders.
I feel like we're not that used to this anymore but again, this is literally like a file explorer, so it's not a big deal imo.
Another important basic concept is linking your notes. You can just right-click a piece of text and link a note, drag and drop the note into your other note, or do [[Note]] whatever you like. Then you can quickly access the other note by clicking on it, or see a preview while hovering over it (If you turned that feature on). Linking notes is also how you get those cool graph views.
I just wanted to mention all of this bc I feel like all the videos I came across on Obsidian intimidate people into thinking it's more complex than that lol
Appearance
I go a little crazy about visual optimization if you give me a chance. You can change a couple of simple things out the box. Light/dark theme, change the font, etc. I'm using a font called Code Saver for the editor (regular is free for personal use).
Then, there are the themes you can download. There are so many awesome ones! I'm using one called Underwater right now bc I liked the rounded edges.
Most themes come with a light/dark version. But if you download the Style Settings plugin, you might unlock more easy-to-customize options. It depends on the theme what you see there. The one I'm using has a couple of built-in colorways. I went with the "rose pine dawn" option and then I switched out some colors in the color pickers. If you want to mess with the colors I highly recommend finding some hex color palettes online, they make your life so much easier. You can find colors that look good together and look up a color and find lighter/darker versions instead of trying to blindly click around on the color picker.
For this theme, you can also add a background image if you want. (If you really want to make it look like Focus Writer for example ;)

Plugins
These are the plugins I'm using right now.
GitHub Sync: This is what I use to sync my progress and back up my files. I started with this before anything else, but I'm not going to go into what I did bc I don't want to make this post even more complicated. If you have a specific question about it, pls feel free to ask me :)
Focus Mode: This is a full-screen mode, very nice for writing
Stille: Dims everything but the active paragraph, again, very nice for writing. I found that the combination of these two plugins work best for me, but there are others like Typewriter Mode that can do both (I couldn't turn down the vignette mode on that one tho and it was annoying me)
Smart Typography: switches the straight quotation marks for curly ones
This is how it looks with Focus Mode and Stiille both on.
And lastly, a bit of a disappointment: Longform. This is the plugin that everyone seems to recommend for longer writing projects in Obisdian. Basically what it does is it can compile your individual notes into one file, and allows you to move the order of them freely, unlike the normal Obsidian sidebar. Here is a pretty good video on it.
Unfortunately, this plugin gets absolutely wrecked by synchronizing to another device.
From what I gathered, this happens regardless of what method of synching you use, meaning it happens even with the paid synching feature. You can read about this more here btw. It's a community plugin so I'm not going to be mad at the creators for not fixing this, however this means it just doesn't work for me.
If it worked on the one computer where I originally set it up, just not on the other, I would be fine with it. But I set it up on my Linux, and after I synched to my Windows, the scene list disappeared from both. (Not the actual files! It just doesn't get recognized as a Longform project anymore so it pretty much becomes useless lol)
So, I just decided to create the the same structure with folders and notes. Right now, this is a discovery draft and I don't have chapters. But I'm making a folder for an "Arc", and put the numbered scenes into them. I'm also making separate notes that I can link with stuff I want to remember/work on.
At the moment I don't require an extensive wiki where I note what each of the characters like to have for breakfast and such. But you can absolutely do that with Obsidian. You can create a folder for Characters, Worldbuilding, whatever you want, really. Put images there, links both internal and on the web and just go wild if you want.
Obviously, without Longform I will need to compile the files into one at the end by a different method, like copy-paste into one, turn them into .txt, and concatenate from the terminal, you know, depending on your comfort level xD. It will probably include more work than with this plugin, but it's not like you don't go through your manuscript about a million times anyways, am I right?
Word Count
Lastly, mentioning the wordcount options bc they are important
there is a built-in wordcount, about which the common agreement is that it's not very good lol
because of this there is a community plugin called Better Wordcount, which is self-explanatory. If you want to get the total word count, you can right-click the top folder of your project and ask it to count the words for you.
Longform also has a wordcount and it will display it like words of the scene/total words of the project if you are using that
if you don't want to have three different word counts displayed I recommend you only have one of these active (:
That's where I am right now. If you have read all this to the end, you're awesome, and also we both should stop procrastinating and go write instead :P But if you also use Obsidian for writing and have cool tips pls let me know xx
#nara's writing diary#nara rambles about writing software again#obsidian#writing software#tech stuff#long post
25 notes
·
View notes
Text
today's adventures in modding:
finally managed to find a body type i like for Arkose (SBTL with some c+)
discovered that the reason my preferred top scar mod (Crow's Puffy Top Scars) had a weird glitch where the fingers looked really shiny/wet was because FTMSE materials were causing problems
ALSO discovered that TBSE IS SUPPOSED TO HAVE SKIN DEPIGMENTATION ON THE HANDS and this was ALSO getting fucked up by the FTMSE materials! which is great because i was very annoyed by the lack thereof, but I had been using FTMSE like the entire time so I never realized it was supposed to include that fsdljifjldskfds
managed to put together a new mod with fixed materials, top scars, and a freckle mod that didn't work out of the box, using nothing but Penumbra, image editor, text editor, and manually dragging around files, because I haven't been able to get TexTools usable on Linux and refused to boot back into Windows out of spite.
Overall a very successful endeavor I think.
4 notes
·
View notes